https://www.xperience-group.com/news-item/calendar-view-in-action-with-microsoft-dynamics-365-crm/
For some record types that are date dependant in CRM, it might make more sense to view the data in a Calendar format. CRM allows you to fairly easily change a standard “row” View of data into a “calendar” View.
The Calendar View can be added to an entity individually by following these steps:
1. You’ll need to switch to “classic” mode within PowerApps Builder in order to enable the calendar control. Once in “classic” mode, find the relevant table within Advanced Settings (or within a Solution) and click on the “Controls” tab:
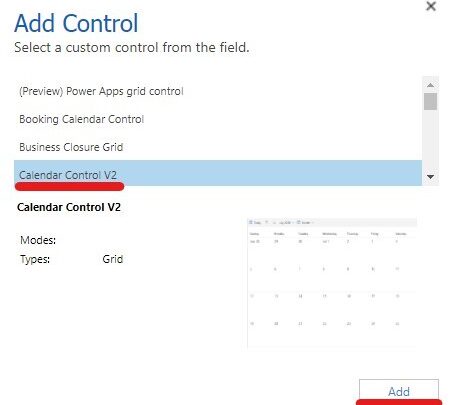
2. Click on the “Add Control” link and then in the pop out window select “Calendar Control V2” and then click “Add”
3. Select which interface (Web, Phone or Tablet) is to use the Calendar control and then tell the Calendar control which fields represent the Start & End Date for the calendar display to use and the Description.
4. To set the field to be used, just click on the little pencil to the right hand side, select a suitable field from the drop down list of available fields and click OK.
5. Once all the mandatory fields have been set, save and publish the changes.
Once enabled for a table, the Calendar View will load by default when you navigate to a View for those records, using the Start and End dates specified to show the record on the appropriate date/time.
The Calendar View can display the records by day, week or month and you can easily navigate to different time periods, much like the Outlook Calendar.
You can even click a slot on the Calendar View to create a new record and it will set the Start Time on the new record accordingly.
It is possible to switch back to the grid View if required by clicking on the “Show As” button in the top right hand corner and selecting “Read Only Grid”.
Further details on setting up the calendar view can be found here and more details on using the calendar view as an end user can be found here.
Want to learn more?